Showing posts with label Windchill Development Environment Setup. Show all posts

Windchill Stickiness in 10.x

In my recent post Windchill Stickiness I wrote about the Windchill Stickiness and how to clear in Windchill 9.1. Here we will discuss how to clear Windchill Stickiness in Windchill 10.x

How to reset Windchill Stickiness in 10.x?
  1. Navigate to http:////app/netmarkets/jsp/user/utilitiesList.jsp
  1. Click “Reset Server Stickiness”. It will ask the confirmation

  1. Click OK to clear server stickiness
  2. To remove all client stickiness, delete all your temporary internet files (usually in the Tools menu), close all browser windows, and restart the browser.

Windchill-Eclipse : Hot Code Replace

In the previous posts Windchill-Eclipse Project Setup and Windchill Method Server Debugging we discussed the basic Windchill development setup. Now it’s time to speed up the development. In this post we are going to add “Hot Code Replace” functionality in our Windchill development environment. The is the real development nitro booster.

What is hot code replace? – Ref: eclipse.org
Hot code replace (HCR) is a debugging technique whereby the Eclipse Java debugger transmits new class files over the debugging channel to another JVM. In the case of Eclipse development, this also applies to the VM that runs the runtime workbench. The idea is that you can start a debugging session on a given runtime workbench and change a Java file in your development workbench, and the debugger will replace the code in the receiving VM while it is running. No restart is required, hence the reference to "hot".

In our Windchill development environment setup, we are going to add eclipse project workspace into Windchill classpath. So when you will start eclipse method server debugging and in between debugging mode if you modify any class, the updated class code will get execute and most importantly without class compile or method server restart.
So we saved a lot time in sysouts, class compilation and method server restart

Add hot code replace in Windchill development environment setup:

  1. Take backup of /codebase/wt.properties.xconf
  2. In /codebase/wt.properties.xconf edit "wt.java.classpath" property value to add eclipse project workspace path. In the property value you need to add your eclipse project workspace bin folder path.
e.g. My eclipse project workspace bin folder path is /opt/eclipseworkspace/Windchill/bin. Replace the directory separator by Windchill directory separator variable $(dir.sep). Now my updated path will be $(dir.sep)opt$(dir.sep)eclipseworkspace$(dir.sep)Windchill$(dir.sep)bin. Add this value in the beginning of property value with the Windchill classpath separator variable $(path.sep).
The updated property value will be like as below ($(path.sep))

Property name="wt.java.classpath" multivalued="$(path.sep)" default="$(dir.sep)opt$(dir.sep)eclipseworkspace$(dir.sep)Windchill$(dir.sep)bin$(path.sep)$(wt.home)$(dir.sep)codebase$(path.sep)$LIB(wt.webinf.lib)$(path.sep) --- and original

  1. Run xconfmanager utility to propagate the xconf value
  2. Restart method server

Note:

  1. Works in eclipse debug mode only
  2. Make sure that Project -> Build Automatically is checked (enabled)
  3. Hot code replace works effectively for method level code changes but some time fails for class level changes like adding method/variable, imports, etc

Now start Windchill development without sysouts and method server restarts. So shift the development gear and go bhuuuummmmmmmm

To know more about hot code replace visit http://wiki.eclipse.org/FAQ_What_is_hot_code_replace%3F


Windchill Method Server Debugging

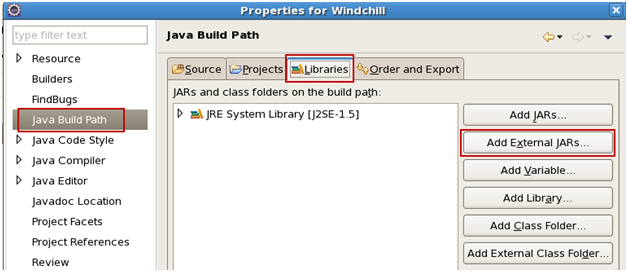
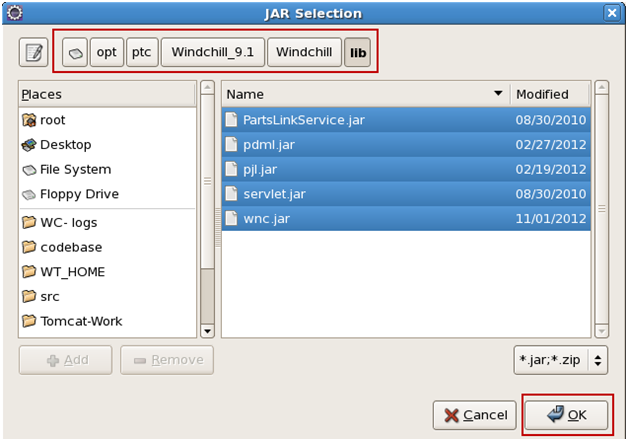
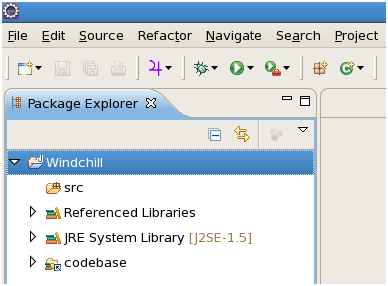
In the last topic Windchill-Eclipse Project Setup we discussed how to setup a Windchill development environment setup in Eclipse.
Now we are adding one more thing in our development environment which will help in debugging Windchill method server in eclipse. Below settings are specific to Windchill 9.1 release.

  1. Set method server running port
            Take backup of /codebase/wt.properties.xconf
In /codebase/wt.properties.xconf edit below property to add method server port and java memory allocations
name="wt.manager.cmd.MethodServer.platform.java.args" default="$(wt.manager.cmd.MethodServer.nonibm.java.args)"

This property pointing to different property again so ultimately we need change
name="wt.manager.cmd.MethodServer.nonibm.java.args" default="-XX:PermSize=72m -XX:MaxPermSize=200m"
Note: The “default” value can be different in your environment.

Change the default value as highlighted below
name="wt.manager.cmd.MethodServer.nonibm.java.args" default="-XX:PermSize=72m -XX:MaxPermSize=200m -Xdebug -Xnoagent -Xrunjdwp:transport=dt_socket, server=y, suspend=n, address=7777 -Djava.compiler=NONE"
  1. Run xconfmanager utility
          Run xconfmanager utility to propagate the xconf value
  1. Restart method server
Once you restart the method server, the method server will start running on port (7777) specified in the property above.
Note: You can check the method server running port in the method server logs. The very first line will show the method server running port.
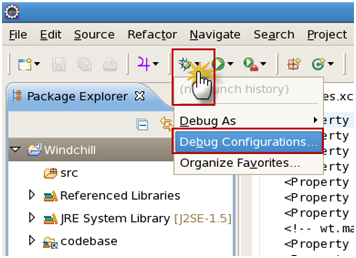
  1. Eclipse debugging setup
    1. Click on Debug -> Debug configurations
   
    1. Navigate to “Remote Java Application” -> “New”
    2. Provide Name, Host and Port. Click on “Apply”.
    3. Click on “Debug”.
  1. If all the properties and setting specified are correct, you will see the eclipse started in debug mode (Note: Method server must be up and running)
  2. Later on you can start method server debugging from Debug drop down directly by selecting your newly created “Remote Java Application” under “Debug”
   

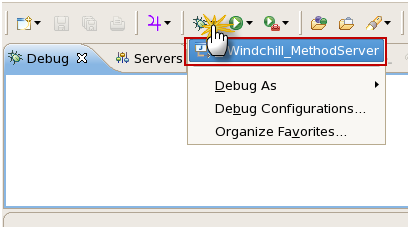
Now you can do Windchill method server debugging as normal as Java project in eclipse.

Windchill-Eclipse Project Setup

  • Open eclipse and select appropriate workspace
  • Create new Java project
    • Go to File -> New -> Project
    • Select “Java Project” and click on Next
    • Enter project name. Select appropriate JDK version depends on the Windchill version you are working on. Click on Finish.
    • The project is created with src folder
  • Right click on project and click on Properties.
    • Note: Navigating to project Properties needed many times. The shortcut is select project and use “Alt + Enter”. This will navigate you to directly project properties.
  • Navigate to Java Compiler -> Building -> Output folder
    • Uncheck the “Scrub output folders when cleaning projects” and click on OK
  • Click on Yes. This will rebuild the project to take the building setting in effect.
  • Add OOTB Windchill JARs and codebase folder in project workspace
    • Navigate to project properties.

Hope you used shortcut (Alt + Enter) to navigate to project properties

    • Navigate to Java Build Path -> Libraries
    • Click on “Add External Jars”. This will open a new selection window. Navigate to Windchill_Home/lib and select all available libraries in this folder and click OK.
    • Click on “Add External Jars”. This will open a new selection window. Navigate to Windchill_Home/codevase/lib and select all available libraries in this folder and click OK.
    • Click on “Add External Jars”. This will open a new selection window. Navigate to Windchill_Home/codebase/WEB-INF/lib and select all available libraries in this folder and click OK.
    • Click on “Add Class Folder”
    • Click on “Create New Folder”
    • Click on “Advanced”
    • Select the checkbox – “Link to folder in the file system”. Click on “Browse”.
    • Navigate to Windchill_Home and select “codebase”
    • Click OK. This will take some time to add the codebase into project workspace.
    • Verify that codebase folder is checked and click OK.
  • Setting build and class load orders
    • Select “Order and Export”
    • Select codebase folder and click on “Top”
    • Use Up/Down key to set the build order. All the source folders should have higher build order than codebase folder.
    • Verify and click OK
  • Final project will look as below

  • Navigate to Project menu and verify that the “Build Automatically” is checked. If not then check.

The Windchill eclipse project setup is done. Now you are set to browse the files available in workspace. E.g.
  • Browse (Ctrl + Shift + R) jsp files
  • Browse(Ctrl + Shift + R) properties files


Next topic: Windchill-Eclipse method server debugging