- Open eclipse and select appropriate workspace
- Create new Java project
- Go to File -> New -> Project
- Select “Java Project” and click on Next
- Enter project name. Select appropriate JDK version depends on the Windchill version you are working on. Click on Finish.
- The project is created with src folder
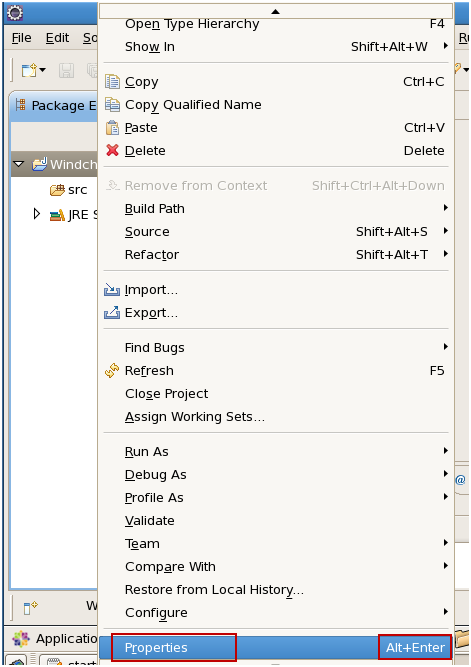
- Right click on project and click on Properties.
- Note:
Navigating to project Properties needed many times. The shortcut is
select project and use “Alt + Enter”. This will navigate you to directly
project properties.
- Navigate to Java Compiler -> Building -> Output folder
- Uncheck the “Scrub output folders when cleaning projects” and click on OK
- Click on Yes. This will rebuild the project to take the building setting in effect.
- Add OOTB Windchill JARs and codebase folder in project workspace
- Navigate to project properties.


Hope you used shortcut (Alt + Enter) to navigate to project properties
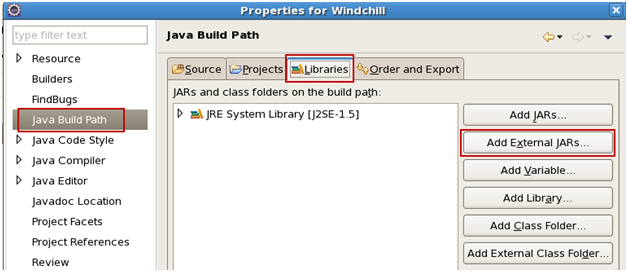
- Navigate to Java Build Path -> Libraries
- Click
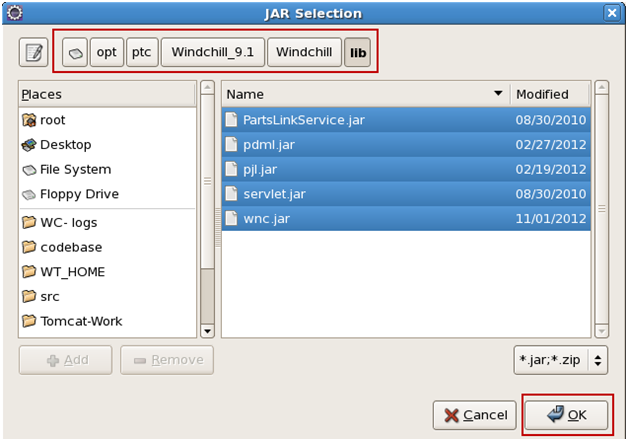
on “Add External Jars”. This will open a new selection window. Navigate
to Windchill_Home/lib and select all available libraries in this folder
and click OK.
- Click
on “Add External Jars”. This will open a new selection window. Navigate
to Windchill_Home/codevase/lib and select all available libraries in
this folder and click OK.
- Click
on “Add External Jars”. This will open a new selection window. Navigate
to Windchill_Home/codebase/WEB-INF/lib and select all available
libraries in this folder and click OK.
- Click on “Add Class Folder”
- Click on “Create New Folder”
- Click on “Advanced”
- Select the checkbox – “Link to folder in the file system”. Click on “Browse”.
- Navigate to Windchill_Home and select “codebase”
- Click OK. This will take some time to add the codebase into project workspace.
- Verify that codebase folder is checked and click OK.
- Setting build and class load orders
- Select “Order and Export”
- Select codebase folder and click on “Top”
- Use Up/Down key to set the build order. All the source folders should have higher build order than codebase folder.
- Verify and click OK
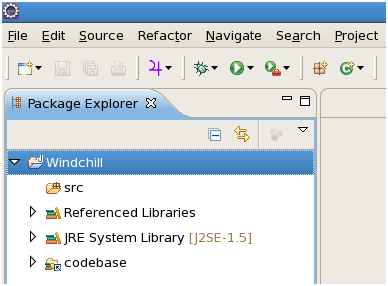
- Final project will look as below


- Navigate to Project menu and verify that the “Build Automatically” is checked. If not then check.

The Windchill eclipse project setup is done. Now you are set to browse the files available in workspace. E.g.
- Browse (Ctrl + Shift + R) jsp files
- Browse(Ctrl + Shift + R) properties files


Next topic: Windchill-Eclipse method server debugging
19 comments:
Hi Mahesh,
It's a very good Initiative started by you.
Your first Article is a first step of Every one who interested in Windchill Development.
Relay Nice Topic Demonstration.
Keep Posting such useful topics on Windchill Customization...
great Work...
Thanks,
Vivek
Hello Mahesh,
It is really a good post to help us to understand "How to get out of Painful process of 'PUT SYSOUT and compile and Restart Method Server'?".
Really impressive knowledge you are sharing.. its is more important considering productivity of Person who is developing/customizing the Windchill code.
Thanks again for useful information.
I also get more information about RBInfo too... :)
Hi Mahesh,
I never tried programming in Windchill. Your blog will surely help me to give a try.
Nice work
Sincerely,
Senthil Venkatachalam
Simply Superb..
Hi Mahesh! Very good post! I haven't found something similar! I have a question, is it work for Windchill 10.1?
Thanks!
Edgar Galván
Yes, this will work for Windchill 10.x. Along with all these steps, include Windchill/srclib/tools/Anno*.jar libraries in eclipse libraries
That was good.
Have you posted the the blog :- Windchill-Eclipse method server debugging
I really want to see .
Hi Rashmi,
Please refer http://maheshmhetre.blogspot.in/2013/02/windchill-method-server-debugging.html
for !0.x onwardds, the setup is very simple Just follow the steps in Basic customization guidel
Hi mahesh i followed your steps for configuration with eclipse, i am using windchill 10.2 F000 ...but is is not working please give some idea..my windchill in running on port 80 ...and i want to do some heavy weight customization using java classes please tell me how to do that .....thankyou
Good work man.Keep blogging.Will help a lot of people.
This is certainly better and easier than setting up using PTC windchill customization guide with running ant files and all.
Nice work!!
Chinmay
hi Mahesh from where will I get the JAR files
Hi Mahesh,
Can you please explain the workspace concept. In your snapshots, you are using the default workspace as /opt/workspace/Windchill. I have followed similar steps as mentioned in your blog but it deletes all my codebase files. I have unchecked the scrub output folders option. So that should not cause it.
i have read your blog on windchill and to know more about future scope of windchill.Is it a tool like pega(drag and drop) or is there chance of development or coding in windchill. pls get back to me as it is very important to me.
- Kunal Bulchandani(bulchandani.kunal@gmail.com)
Hi Mahesh,
How can I download windchill 10.2 to my system.
how do I execute my java code into method server from eclipse (with a different workspace) using RMI?
@Mahesh Mhetre Hi Sir! I'm Soundarya, an Intern and I Need Help on Windchill ! Would be helpful if you could reach out to soundaryaathimuthu@gmail.com
Thanks.
HI MAHESH, CAN YOU TELL ME HOW TO RUN THE PROJECT IN ECLIPSE???
Post a Comment